Get Started:Create a Game
Welcome to creating your first game with AdventureJS. The first thing you'll need to do is to download GetStartedGame.zip, which contains a set of project files. Download & unzip & open the resulting folder in your text editor of preference. (We like Visual Studio Code.) In that collection is an empty file named MyGame.js that is ready for you to add game code. You'll also find the completed tutorial code in MyGame_Complete.js if you want to look through that for reference.
The first thing to add to MyGame.js is a game constructor. What we're doing here is saying to the browser, give me a new instance of the adventurejs Game class. That's your whole game container. Everything else you create will live inside of that.
var MyGame = new adventurejs.Game( "MyGame", "MyGameDisplay" );And there you have it: a basic working game. If maybe not a very interesting game.
#TMI How to Debug
If you're new to development in general, you might not be concerned with debugging right now, and that's ok, because we'll cover it later. If you're a pro it was probably one of your first questions. Either way, be aware that you have some debugging options available. AdventureJS has two debug channels.
First, you have the option to print debug messages straight to the game display. These are limited, targeted messages that tell you some things about how the parser is handling input. When player input fails due to conditions in the game world (vs a technical problem), this can often tell you why.
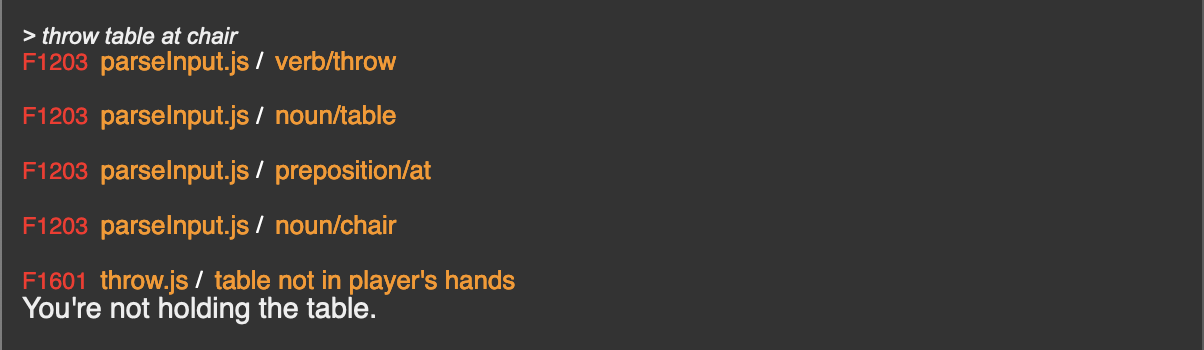
To enable this kind of debugging, you can use settings.debug_keywords when you create the game.
var MyGame = new adventurejs.Game( "MyGame", "MyGameDisplay" )
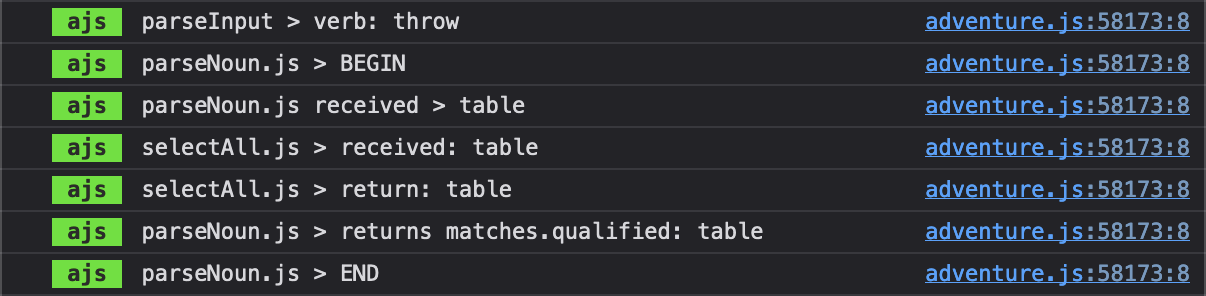
.set( debug_keywords: { general: true });AdventureJS can also print a firehose of deeper status information to the browser's developer console. You can choose what prints to the console through options in game.settings. Here's a very small example.
To learn more, check out the debugging tutorial.
Creating a new Game instance returns a new Game, and the Game class has a method named .set(). This is a chainable method that lets you pass in settings at creation time. So we're going to expand on this a little bit by passing in some basic game settings. Feel free to write in your own author name, game title and description here.
var MyGame = new adventurejs.Game( "MyGame", "MyGameDisplay" )
.set({
  title: "Dungeon Drifter",
  author: "Dungeon Master Dan",
  description: "Welcome to the dungeon, baby!",
  version: "0.0.1",
});
Not much difference, but isn't it satisfying to put your name on it?
A game instance only requires two assets to be defined: a player character, and a room. The player character is kind of like the camera into the world – without it, there's no way to interact with the world – and the player needs a room to be in. We'll define those in the next tutorials. Meanwhile, since we haven't defined a player and room yet, AdventureJS has created them automatically.
#TMI About "MyGame"
Take a look at how we've named the game "MyGame".
var MyGame = new adventurejs.Game( "MyGame", "MyGameDisplay" )What we're doing here is creating a global variable that is scoped to window.
Wow, that is three reference links in one statement. See? Geeky. We're not sure who's going to use AdventureJS but we're trying to support everyone from n00bs to haxors. You might find this too hard or too easy or just right. If it's not helpful, ignore it for now!
Anyhoo, this first statement is creating a variable named MyGame that is scoped to the browser window, which is a way of saying that it's a global variable that's available anywhere. If you open the browser's developer console and type "MyGame" you should see something like this.

The second line is showing that MyGame is an instance of class Game, along with a few of its properties. Another way of referencing that is window.MyGame. You should get the same results by typing "window.MyGame" into the console.

Objects inside your game that have their own scope will be able to reference the game through the use of this variable. If you write custom code, you'll be able to do the same. And you don't have to use the name MyGame – you're welcome to call your game whatever you like.
#TMI About "MyGameDisplay"
Take a look at where we're passing "MyGameDisplay" in to the new Game constructor.
var MyGame = new adventurejs.Game( "MyGame", "MyGameDisplay" )Now, take a look at the index.html file you downloaded.
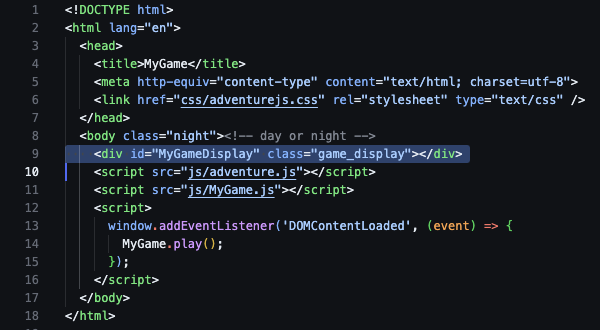
See line 9. What we've done here is to create an HTML element with class "ajs-display" to be the container of the game. We pass that element's ID in to the Game constructor, and AdventureJS creates all the other HTML elements needed to run the game. If you don't pass an HTML element ID, AdventureJS will create an element for you and append it to document.body.